AWS Database Migration Service による Change Data Capture: 前編
AWS Database Migration Service (以下、DMS) で Change Data Capture(CDC) を試してみました。
目的
目的は、Private Subnet にある RDS の変更レコードを、Google BigQuery へ転送することです。 CDC を行う OSS には Debezium がありますが、運用でなるべく楽をしたかったので、DMS を選んでみました。
構成
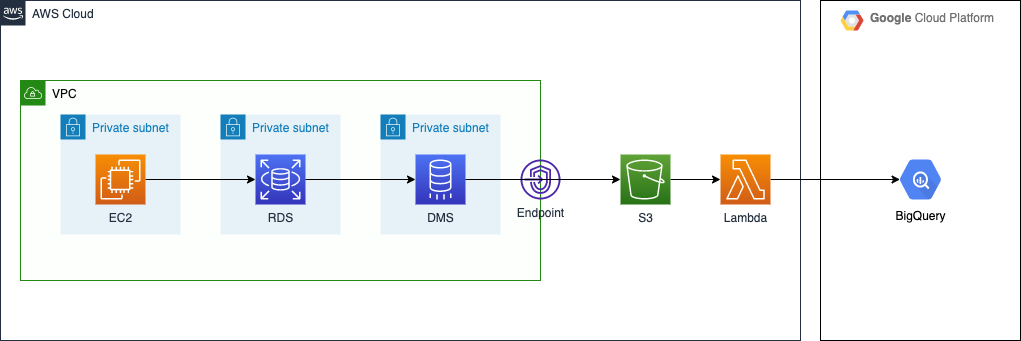
EC2 から RDS(MySQL 8.0) に対してレコードの変更を行い、それを DMS が捕捉して S3 バケットへ出力します。VPC は本番っぽい雰囲気にしてみました。出力先を S3 にした理由は、AWS から外部にデータを転送するのは S3 が一番安いこと*1、Kinesis Stream よりもエラー発生時のハンドリングが楽そう、の二点です。
このあと、S3 バケットへの Put をトリガーに Lambda Function で BigQuery へ Streaming Insert を行う予定です。前編では S3 バケットへのファイル出力までを扱います。
ソースコードは下記のリポジトリで公開しています(CloudFormation で作成しています)。
検討にあたっては、以下の記事を参考にさせていただきました。
DMS のしくみ
DMS の概要図
DMS は、Source や Target と接続するための Endpoint と、Replication Instance、そこで実行される Replication Task で構成されています。今回は Source を RDS for MySQL, Target を S3 としています。

What is AWS Database Migration Service? - AWS Database Migration Service
MigrationType
MigrationType は3つの中から選べます。今回は CDC only を試しました。
- Full load (Migrate existing data) – If you can afford an outage long enough to copy your existing data, this option is a good one to choose. This option simply migrates the data from your source database to your target database, creating tables when necessary.
- Full load + CDC (Migrate existing data and replicate ongoing changes) – This option performs a full data load while capturing changes on the source. After the full load is complete, captured changes are applied to the target. Eventually, the application of changes reaches a steady state. At this point, you can shut down your applications, let the remaining changes flow through to the target, and then restart your applications pointing at the target.
- CDC only (Replicate data changes only) – In some situations, it might be more efficient to copy existing data using a method other than AWS DMS. For example, in a homogeneous migration, using native export and import tools might be more efficient at loading bulk data. In this situation, you can use AWS DMS to replicate changes starting when you start your bulk load to bring and keep your source and target databases in sync.
Components of AWS DMS - AWS Database Migration Service
環境構築のポイント
RDS パラメータグループ
MySQL の binlog_format を ROW にします。
  DBParameterGroup:
    Type: AWS::RDS::DBParameterGroup
    Properties:
      Description: Parameter group for mysql 8.0
      Family: "mysql8.0"
      Parameters:
        "binlog_format": "ROW"
RDS への接続情報は SecretsManager に入れると便利
DMS Endpoint から RDS へ接続するための情報は、SecretsManager に入れると管理しやすいと思います。
こんな感じにシークレットとロールと作成して*2、
  RdsSecret:
    Type: AWS::SecretsManager::Secret
    Properties:
      Name: !Ref StackName
      SecretString: !Sub '{
          "username": "${RdsMasterUsername}",
          "password": "${RdsMasterUserPassword}",
          "engine": "mysql",
          "host": "${RdsInstance.Endpoint.Address}",
          "port": ${RdsInstance.Endpoint.Port},
          "dbname": "${RdsDbName}",
          "dbInstanceIdentifier": "${RdsInstance}"
        }'

  DmsRdsEndpointAccessRole:
    Type: AWS::IAM::Role
    Properties:
      RoleName: dms-rds-endpoint-access-role
      AssumeRolePolicyDocument:
        Version: "2012-10-17"
        Statement:
          - Effect: Allow
            Principal:
              Service:
                - dms.ap-northeast-1.amazonaws.com
            Action:
              - sts:AssumeRole
      Path: /
      Policies:
        - PolicyName: dms-rds-endpoint-access-policy
          PolicyDocument:
            Version: "2012-10-17"
            Statement:
              - Effect: Allow
                Action:
                  - secretsmanager:GetSecretValue
                Resource:
                  - !Ref RdsSecret
Endpoint 作成のときにそれぞれの ARN を指定すればよいので便利です。
  DmsEndpointSourceMySql:
    Type: AWS::DMS::Endpoint
    Properties:
      EndpointIdentifier: source-endpoint-mysql
      EngineName: mysql
      EndpointType: source
      MySqlSettings:
        SecretsManagerSecretId:
          Fn::ImportValue: !Sub ${VpcResourceStack}-RdsSecretArn
        SecretsManagerAccessRoleArn:
          Fn::ImportValue: !Sub ${VpcResourceStack}-DmsRdsEndpointAccessRoleArn
Replication Instance 用の Subnet Group を作成するときに特定の Role が必要
Replication Instance 用の Subnet Group をマネジメントコンソールで作成すると、AmazonDMSVPCManagementRole をもつロールが裏側で自動生成されます。 CloudFormation で作成する場合はこのロールは作成されないため、CreateReplicationSubnetGroup のステップでエラーになります。そのため、以下のように個別に作成します。
  DmsVpcRole:
    Type: AWS::IAM::Role
    Properties:
      RoleName: dms-vpc-role
      Path: /
      AssumeRolePolicyDocument:
        Version: "2012-10-17"
        Statement:
          - Effect: Allow
            Principal:
              Service:
                - dms.amazonaws.com
            Action:
              - sts:AssumeRole
      ManagedPolicyArns:
        - arn:aws:iam::aws:policy/service-role/AmazonDMSVPCManagementRole
https://forums.aws.amazon.com/thread.jspa?messageID=921775
S3 への出力設定
Target Endpoint の設定で、S3 への出力方式を指定できます。出力ファイル形式は、CSV か Apache Parquet から選べます。
以下のように設定した場合、だいたい60秒ごとに s3://bucketName/schemaName/tableName/YYYY/MM/DD/YYYYMMDD-hhmmssSSS.parquet として出力されます。
  DmsEndpointTargetS3:
    Type: AWS::DMS::Endpoint
    Properties:
      EndpointIdentifier: target-endpoint-s3
      EngineName: s3
      EndpointType: target
      S3Settings:
        BucketName:
          Fn::ImportValue: !Sub ${S3Stack}-S3BucketName
        ServiceAccessRoleArn:
          Fn::ImportValue: !Sub ${S3Stack}-DmsS3EndpointAccessRoleArn
        EncryptionMode: SSE_S3
        CdcMaxBatchInterval: 60
        DataFormat: parquet
        ParquetVersion: PARQUET_2_0
        CompressionType: GZIP
        DatePartitionEnabled: true
        DatePartitionSequence: YYYYMMDD
        DatePartitionDelimiter: SLASH
捕捉対象とするスキーマとテーブルの指定
(一般にRDBMSでいう)スキーマとテーブルの指定は、ReplicationTask の TableMappings の設定で実現できます。以下の例では、RDS にあるすべてのスキーマ・テーブルを対象にしています。
  ReplicationTask:
    Type: AWS::DMS::ReplicationTask
    Properties:
      ReplicationTaskIdentifier: !Ref AWS::StackName
      MigrationType: cdc
      SourceEndpointArn: !Ref DmsEndpointSourceMySql
      TargetEndpointArn: !Ref DmsEndpointTargetS3
      ReplicationInstanceArn:
        Fn::ImportValue: !Sub ${VpcResourceStack}-ReplicationInstanceArn
      TableMappings: '{
          "rules": [{
            "rule-type": "selection",
            "rule-id": "1",
            "rule-name": "1",
            "object-locator": { "schema-name": "%", "table-name": "%" },
            "rule-action": "include"
          }]
        }'
Selection rules and actions - AWS Database Migration Service
検証
EC2 から mysqlslap を実行
EC2 からRDS に向けてレコードの操作を行います。今回は MySQL の負荷エミュレーションクライアントであり、MySQL Client に入っている mysqlslap を使いました。
MySQL :: MySQL 8.0 Reference Manual :: 4.5.8 mysqlslap — A Load Emulation Client
このようにして大量のクエリを発行します。mysqlslap が行った変更内容が S3 に出力されていれば OK です。
mysqlslap \
    --user=dbuser \
    --password=dbpassword \
    --host=endpointarn.region.rds.amazonaws.com \
    --engine=innodb \
    --concurrency=5 \
    --iterations=100 \
    --auto-generate-sql \
    --auto-generate-sql-load-type=mixed \
    --number-char-cols=5 \
    --number-int-cols=5 \
    --auto-generate-sql-write-number=1000
S3 出力結果
出力された s3://bucketname/mysqlslap/t1/2022/03/25/20220325-105314539.parquet の内容を、PyArrow を使って見てみます。
import pyarrow.parquet as pq

df = pq.read_table("20220325-105314539.parquet").to_pandas()
df.info()
print(df.loc[:, ["Op", "CdcTimestamp", "intcol1", "charcol1"]].head())
$ python pq_reader.py
<class 'pandas.core.frame.DataFrame'>
RangeIndex: 6762 entries, 0 to 6761
Data columns (total 12 columns):
 #   Column        Non-Null Count  Dtype
---  ------        --------------  -----
 0   Op            6762 non-null   object
 1   CdcTimestamp  6762 non-null   object
 2   intcol1       6762 non-null   int32
 3   intcol2       6762 non-null   int32
 4   intcol3       6762 non-null   int32
 5   intcol4       6762 non-null   int32
 6   intcol5       6762 non-null   int32
 7   charcol1      6762 non-null   object
 8   charcol2      6762 non-null   object
 9   charcol3      6762 non-null   object
 10  charcol4      6762 non-null   object
 11  charcol5      6762 non-null   object
dtypes: int32(5), object(7)
memory usage: 502.0+ KB
  Op                CdcTimestamp     intcol1                                           charcol1
0  I  2022-03-25 10:52:08.000000   364531492  SuKo4M5OM7ldvisSc6WK9rsG9E8sSixocHdgfa5uiiNTGF...
1  I  2022-03-25 10:52:09.000000   831083598  uM4AMHY0BmXJ4TTmfOiqCj68zYIGxDFjbJlpd9pgvCr0iK...
2  I  2022-03-25 10:52:09.000000  1120090212  dqYCp1NIXNHwBkTsAXo6jksWbzaOJXppDE12FHCmgLar53...
3  I  2022-03-25 10:52:09.000000  1798340127  7nZN3RdI96aQOP4Y0z7dlO4wbQF1OpvYdLnggGrqMP8mjC...
4  I  2022-03-25 10:52:09.000000  1066832056  TpfJIwjeemwIeMLL8De6AogdtGl5wTZPA4kTtR7X5wpjIA...
Insert した内容が出力できています。これで CDC データを S3 に出力できるところまで確認できました。
(後編に続く)
2022-04-07: 後編を書きました